先備知識與注意事項
雖說是Rotation(旋轉),但其實沒有這麼神奇,只是視覺上看起來像旋轉,在電腦實際將讀取的程式碼實現上,僅僅是數個pointer之指向的重新改寫,所以千萬別害怕。
本篇文章的第一部分將以Insert(新增資料)與Delete(刪除資料)來說明為什麼需要Rotation(旋轉),但是讀者可以先不必理會細節,因為實際上的Insert與Delete將有更多情況必須考慮,此部分將留待後續文章逐項說明,在本篇文章只要掌握Rotation(旋轉)即可。
目錄
於RBT中進行Insert與Delete後竟然不符合RBT
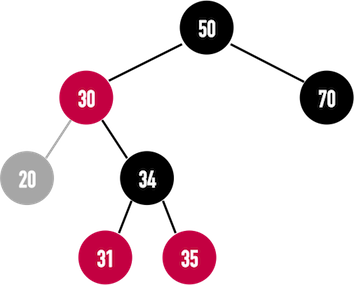
現考慮如圖一(a)之RBT,欲進行Insert(新增資料)與Delete(刪除資料):
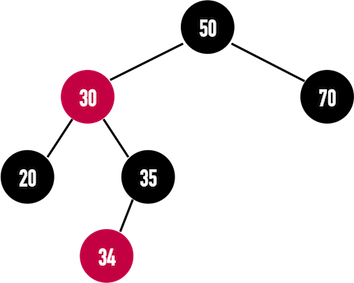
圖一(a):一棵符合規則的RBT。
為滿足RBT之特徵第五點:從root走向任何一個leaf node(NIL)的任何一條path上之黑色node數皆相同,一般在RBT中Insert(新增資料)時,會先將欲新增的node塗成紅色。
若幸運地,新增的node接在黑色node上,則RBT仍然是一棵RBT,如圖一(b),新增node(15)。
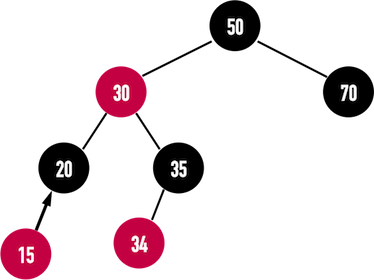
圖一(b):在RBT中新增node(15),新增完後仍然滿足RBT之規則。
但是,若要在RBT中新增node(31),因為node(34)是紅色,此處便會出現紅色與紅色相連的情況,違反RBT之第四點特徵,因此需要修正,如圖一(c)。
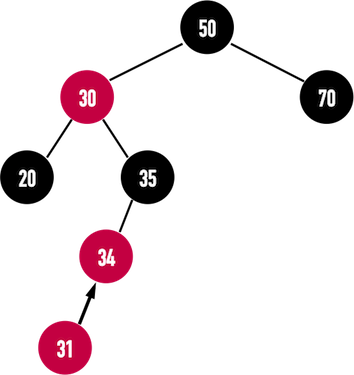
圖一(c):在RBT中新增node(31),新增完後無法滿足RBT之規則。
修正的方法便是將node(35)塗成紅色,node(34)塗成黑色,並且對node(35)進行Right Rotation(向右旋轉),如此一來,RBT便能維持其基本特徵。
值得注意的是,在執行Rotation時,有時會順便調整RBT的height(樹高),使得RBT維持在平衡(balanced)的狀態。
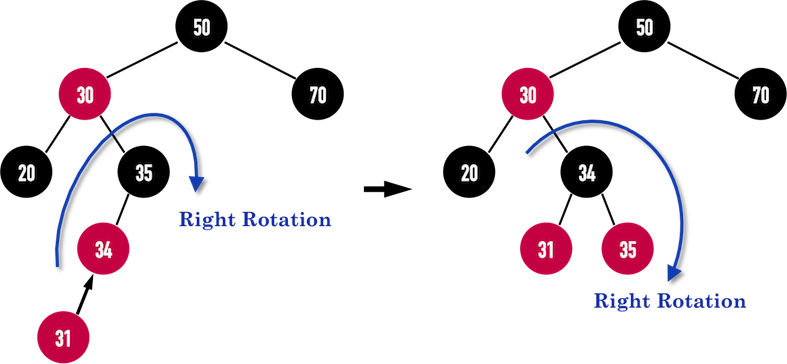
圖一(d):使用Rotation對Insert(新增資料)進行修正。
在正確新增node(31)後,若要刪除node(20),因為node(20)是黑色,若將其刪除則違反RBT之第五點特徵:從root走向任何一個leaf node(NIL)的任何一條path上之黑色node數皆相同,因此同樣需要進行修正。
圖一(e):因為node(20)是黑色,若將其刪除會違反RBT之第五點特徵。
修正的方法則是將node(30)塗黑,node(34)塗紅,然後對node(34)進行Left Rotation(向左旋轉),如此一來,RBT便能維持其基本特徵。
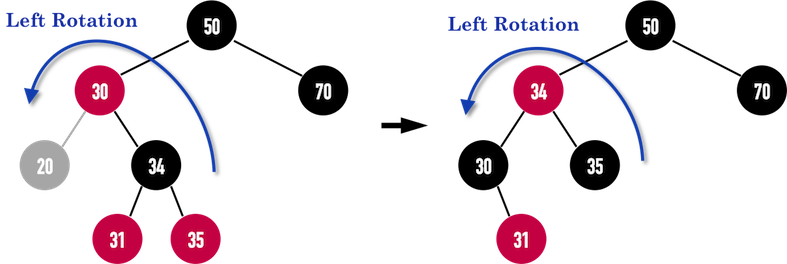
圖一(f):使用Rotation對Delete(刪除資料)進行修正。
經過以上說明,應該能體會到Rotation在修正Insert(新增資料)與Delete(刪除資料)時的威力,接著便來實地走訪Rotation實際上是哪些pointer在指來指去。
Rotation(旋轉)
在說明Rotation(旋轉)之前有兩點需要先申明:
- 若是要應用在BST上,則Rotation(旋轉)前後的BST必須要維持相同之Key排序。此處介紹的Rotation(旋轉)便屬於此類。
- Rotation(旋轉)與node是否具有顏色無關,即使是在一般的BST,亦能夠使用Rotation(旋轉)來調整height(樹高)。
Left Roration(向左旋轉)
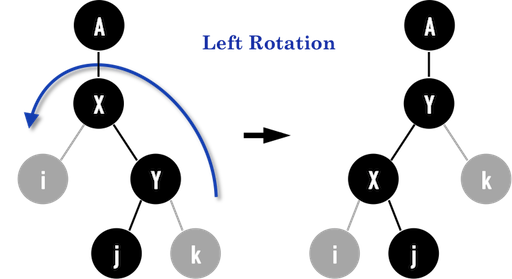
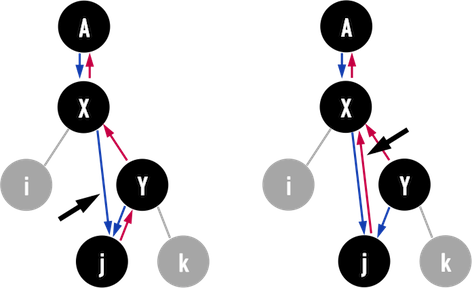
圖二(a):。
從圖二(a)中可以看出,要對以node(X)為root之subtree進行Left Rotation,必須調整的pointer分別長在node(X)、node(Y)、node(A)與node(j)身上,其中node(j)有可能為NIL,不過為求完整,在此將以node(j)不為NIL作說明。
另外,node(i)與node(k)是否為NIL皆不影響Left Rotation。
- 由圖二(a)看得出來,node(i)在旋轉前後始終是node(X)的left child;
- node(k)在旋轉前後始終是node(Y)的right child。
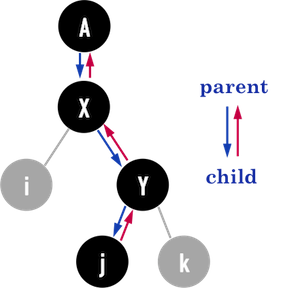
圖二(b):。
圖二(b)將所有可能需要更動的pointer列出,其中,藍色箭頭表示「由parent指向child」,紅色箭頭則為「child指向parent」。
Left Roration(向左旋轉)之步驟如下:
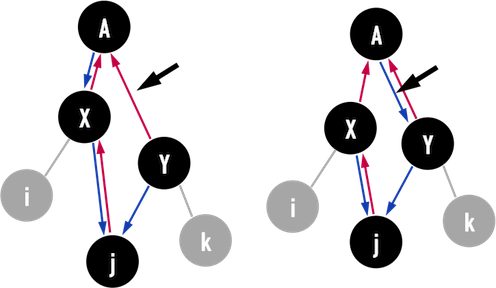
- 在Left Rotation完成後,node(Y)的
leftchild將會接上node(X),因此要先把原先node(Y)的leftchild(也就是node(j))放到node(X)的rightchild:- 圖二(c)左:將node(X)的
rightchild指向node(j); - 圖二(c)右:將node(j)的
parent指向node(X)。
- 圖二(c)左:將node(X)的
圖二(c):。
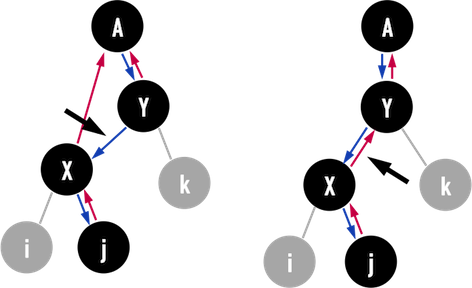
- Left Rotation完成後,node(X)的
parent將會是node(Y),而node(Y)的parent要改成原先node(X)的parent(也就是node(A)):- 圖二(d)左:將node(Y)的
parent指向node(A)。 - 圖二(d)右:接著判斷,若原先node(X)是node(A)的
leftchild,那麼node(Y)同樣是node(A)的leftchild,反之,node(Y)則成為node(A)的rightchild。
- 圖二(d)左:將node(Y)的
圖二(d):。
- 最後,只要再把node(Y)的
leftchild指向node(X),如圖二(e)左,並把node(X)的parent接上node(Y),如圖二(e)右,Left Rotation便完成了。
圖二(e):。
最後再看一次圖二(a),若忽略node(A),左圖中,其餘node之Key順序為\(i<X<j<Y<k\),而右圖中的順序亦為\(i<X<j<Y<k\),因此,如上所述的Left Rotation能夠應用在BST上。
圖二(a):。
Left Rotation之程式範例如下:
// C++ code
void RBT::LeftRotation(TreeNode *x){

    TreeNode *y = x->rightchild;         // 把y指向x的rightchild, 最後y會變成x的parent

    x->rightchild = y->leftchild;        // 圖二(c)左, 把y的leftchild托在x的rightchild

    if (y->leftchild != neel){           // 圖二(c)右, 若node(j)為NIL則忽略
        y->leftchild->parent = x;        // 將原先y的leftchild的parent改成x
    }

    y->parent = x->parent;               // 圖二(d)左, 更新y的parent

    if (x->parent == neel){              // 圖二(d)右, 若原先x是root, 旋轉後y變成新的root
        root = y;
    }
    else if (x == x->parent->leftchild){ // 若原先x是其parent的leftchild
        x->parent->leftchild = y;        // 更新後y也是其parent的leftchild
    }
    else{                                // 若原先x是其parent的rightchild
        x->parent->rightchild = y;       // 更新後y也是其parent的rightchild
    }
    y->leftchild = x;                    // 圖二(e)左, 最後才修改y與x
    x->parent = y;                       // 圖二(e)右
}
Right Roration(向左旋轉)
Right Rotation的邏輯與Left Rotation完全相同,只要確實地把與node(X)、node(Y)、node(A)與node(j)有關的pointer重新指向正確的記憶體位置,就能夠完成Right Rotation。
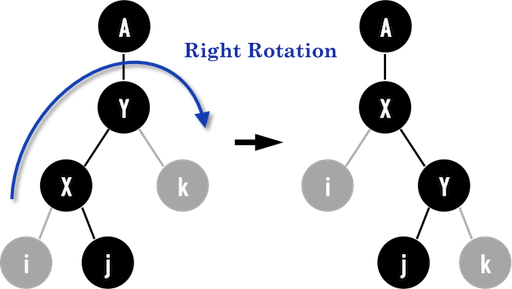
圖三:。
Right Rotation之程式範例如下,把所有LeftRotation()中的left-與right-對調就是了:
// C++ code
void RBT::RightRotation(TreeNode *y){

    TreeNode *x = y->leftchild;           // 把x設成y的leftchild

    y->leftchild = x->rightchild;         // 把x的rightchild放到y的leftchild
    if (x->rightchild != neel){           // 若x的rightchild不為NIL, 將其parent指向y
        x->rightchild->parent = y;
    }
    x->parent = y->parent;                // 將x的parent指向原先y的parent
                                          // 以下一組if-else將修改原先y的parent之child
    if (y->parent == neel){               // 若y原先是root, x將成為新的root
        root = x;
    }
    else if (y == y->parent->leftchild){  // 若原先y是其parent之leftchild,
        y->parent->leftchild = x;         // x就成為其新的parent之leftchild
    }
    else{                                 // 若原先y是其parent之rightchild,
        y->parent->rightchild = x;        // x就成為其新的parent之rightchild
    }
    x->rightchild = y;                    // 將y設為x之rightchild
    y->parent = x;                        // 將x設為y之parent
}
以上便是Rotation(旋轉)的說明,在接下來介紹Insert(新增資料)與Delete(刪除資料)的兩篇文章中將會再次與各位相會。
參考資料:
- Introduction to Algorithms, Ch13
- Fundamentals of Data Structures in C++, Ch10
- GeeksforGeeks:Red Black Tree
RBT系列文章
Red Black Tree: Intro(簡介)
Red Black Tree: Rotation(旋轉)
Red Black Tree: Insert(新增資料)與Fixup(修正)
Red Black Tree: Delete(刪除資料)與Fixup(修正)
回到目錄: