先備知識與注意事項
(完整範例程式碼也可以看這裡:BST_Delete.cpp)
由於Sort與Delete會用到先前在Binary Tree:Traversal介紹過的Leftmost()、Rightmost()、Successor()與Predecessor(),因此建議在開始閱讀本篇文章之前,先復習上述四個函式操作。
同樣先瞄一眼class TreeNode與class BST的定義,與前一篇Binary Search Tree: Search(搜尋資料)、Insert(新增資料)的範例程式碼只多了一個函式BST::DeleteBST()。
// C++ code
#include <iostream>
#include <string>
#include <queue>

using std::string;
using std::cout;
using std::endl;

class BST;
class TreeNode{
private:
    TreeNode *leftchild;
    TreeNode *rightchild;
    TreeNode *parent;
    int key;
    string element;
public:
    TreeNode():leftchild(0),rightchild(0),parent(0),key(0),element(""){};
    TreeNode(int a, string b):leftchild(0),rightchild(0),parent(0),key(a),element(b){};

    int GetKey(){return key;}              // 為了在main()要能夠檢視node是否正確
    string GetElement(){return element;}   // 才需要這兩個member function讀取private data

    // 其餘情況, 因為class BST是class TreeNode的friend class
    // 在class BST的member function中, 可以直接存取class TreeNode的private data

    friend class BST;   // 放在 private 或 public 都可以
};

class BST{
private:
    TreeNode *root;
    TreeNode* Leftmost(TreeNode *current);
    TreeNode* Successor(TreeNode *current);
public:
    BST():root(0){};

    TreeNode* Search(int key);
    void InsertBST(int key, string element);
    void InorderPrint();        // 可以用來確認BST是否建立成功
    void Levelorder();          // 可以確認BST是否建立成功
    void DeleteBST(int key);
};
目錄
Sort(排序)
讀者可能會發現,在class BST的定義中,根本就沒有類似SortBST()的函式,沒錯,因為在BST中,每一個subtree都有Key(L)<Key(Current)<Key(R)的性質,這正好與Inorder(LVR)之順序相同,因此,對整棵樹進行Inorder Traversal,就能夠對資料由小到大(依照Key)進行Visiting。
以上一篇的main()所建立的BST為例,如圖一,要將此樹中的資料按照Key之順序由小到大印出,只需要對整棵樹做一次Inorder Traversal即可。
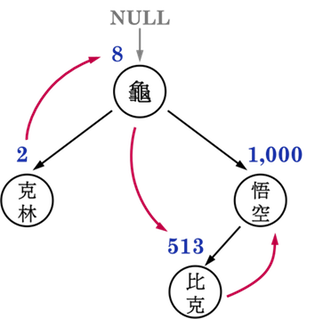
圖一:。
以下範例程式,將Visiting用作列印資料(print):
// C++ code
void BST::InorderPrint(){
    TreeNode *current = new TreeNode;
    current = Leftmost(root);
    while(current){
        cout << current->element << "(" << current->key << ")" << " ";
        current = Successor(current);
    }
}
output:
克林(2) 龜仙人(8) 比克(513) 悟空(1000)
灌水結束,重頭戲來了。
BST::DeleteBST(刪除資料)
要在BST上執行刪除資料(被刪除的node稱為A),必須讓刪除A後的BST仍然維持BST的性質。因此,所有「具有指向A的pointer」之node(也就是A的parent、leftchild以及rightchild)都必須調整該pointer,使其指向新的記憶體位置。
刪除資料的工作,根據欲刪除之node「有幾個child pointer」分成三類:
- Case1:欲刪除之node沒有child pointer;
- Case2:欲刪除之node只有一個child pointer(不論是
leftchild或rightchild); - Case3:欲刪除之node有兩個child pointer。
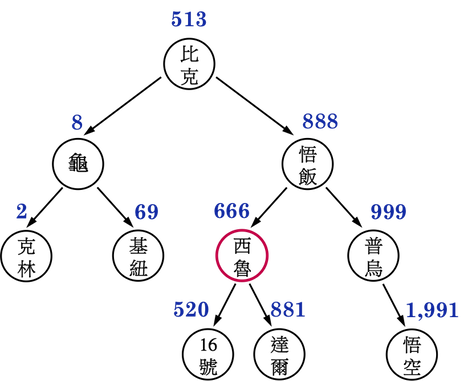
以圖二(a)為例,依序刪除撒旦、弗力札與西魯:
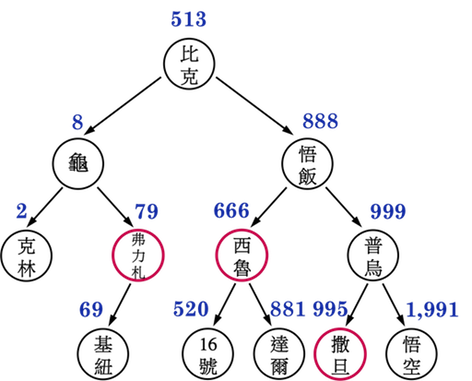
圖二(a):。
- Case1:由於撒旦沒有child pointer,因此只要考慮撒旦的parent(普烏),將普烏的
leftchild指向NULL即可維持BST的正確性,如圖二(b)。
圖二(b):。
- Case2:由於弗力札有一個
leftchild(基紐),因此在刪除弗力札之前,需要先將基紐的parent指向弗力札的parent(龜仙人),並且將龜仙人的rightchild從原本的弗力札指向基紐,因為基紐原本就位於龜仙人的right subtree(右子樹),因此,上述操作仍能維持BST的正確性,如圖二(c)。
圖二(c):。
- Case3:由於西魯有兩個child,若直接刪除西魯的資料,並釋放其記憶體位置,要牽動的node較多。變通的祕訣就是「找替身」,原本要刪西魯,但是實際上是釋放西魯的「Successor(達爾)」的記憶體位置(或是「Predecessor(16號)」的記憶體位置),最後再把「Successor(達爾)」(或是「Predecessor(16號)」)的資料放回到西魯的記憶體位置上,又因為BST的特徵,所有「具有兩個child」的node的Successor或是Predecessor一定是leaf node或是只有一個child,如此,便回到如同撒旦與弗力札「至多只有一個child」的情境。
稍微驗證一下「具有兩個child的node的Successor或是Predecessor一定是leaf node或是只有一個child」,若某個node有兩個child:
- Successor找的是「right subtree中Key最小的node」;
- Predecessor找的是「left subtree中Key最大的node」;
因此Successor和Predecessor必定不會同時也有兩個child。以圖二(d)為例:
- 龜仙人(\(8\))的Predecessor為克林(\(2\)),Successor為基紐(\(69\));
- 比克(\(513\))的Predecessor為基紐(\(69\)),Successor為16號(\(520\));
- 悟飯(\(888\))的Predecessor為達爾(\(881\)),Successor為普烏(\(999\));
圖二(d):。
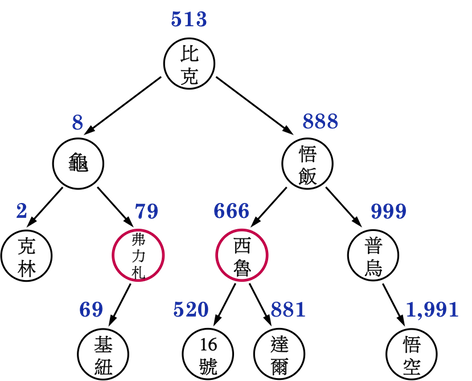
- 回到Case3,現欲刪除西魯,就去找西魯的Successor(達爾)當做替身,因為達爾沒有child,其刪除方法便如同上述刪除撒旦的方法,如圖二(e)。
- 要刪除西魯的Predecessor(16號)也可以。範例程式碼要記得修改。
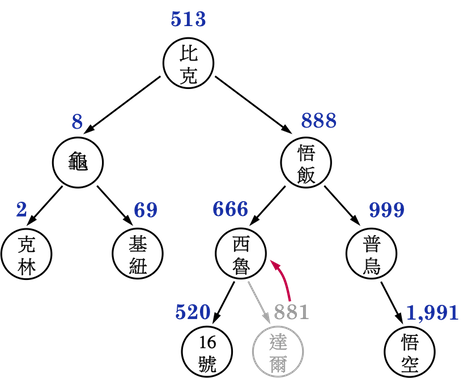
圖二(e):。
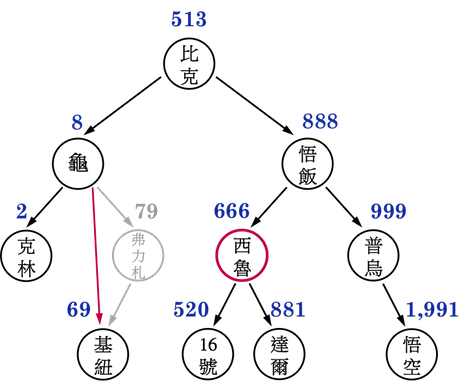
- 最後再將達爾的資料放進原先存放西魯資料的記憶體位置,便完成了刪除西魯的操作,如圖二(f)。
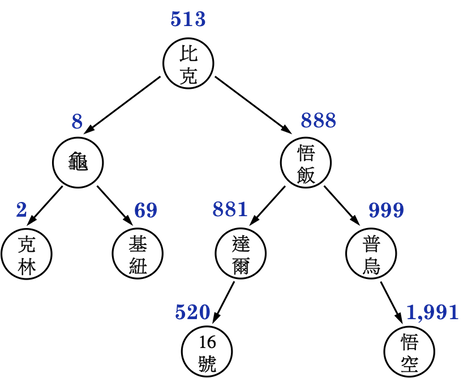
圖二(f):。
BST::DeleteBST()之範例程式碼分成以下幾個步驟::
- 先以
BST::Search()確認想要刪除的node是否存在BST中; - 把真正會被釋放記憶體的pointer調整成「至多只有一個child」的node;
- 把真正會被釋放記憶體的node的child指向新的
parent; - 把真正會被釋放記憶體的node的
parent指向新的child; - 若真正會被釋放記憶體是「替身」,再把替身的資料放回BST中。
即完成BST之刪除資料操作。
// C++ code
void BST::DeleteBST(int KEY){               // 要刪除具有KEY的node

    TreeNode *delete_node = Search(KEY);    // 先確認BST中是否有具有KEY的node
    if (delete_node == NULL) {
        std::cout << "data not found.\n";
        return;
    }

    TreeNode *y = 0;      // 真正要被刪除並釋放記憶體的node
    TreeNode *x = 0;      // 要被刪除的node的"child"

    if (delete_node->leftchild == NULL || delete_node->rightchild == NULL){
        y = delete_node;
    }
    else{
        y = Successor(delete_node);        // 將y設成delete_node的Successor
    }                                      // 經過這組if-else, y調整成至多只有一個child
                                           // 全部調整成case1或case2來處理
    if (y->leftchild != NULL){
        x = y->leftchild;                  // 將x設成y的child, 可能是有效記憶體,
    }                                      // 也有可能是NULL
    else{
        x = y->rightchild;
    }

    if (x != NULL){                        // 在y被刪除之前, 這個步驟把x接回BST
        x->parent = y->parent;             // 此即為圖二(c)中, 把基紐接回龜仙人的步驟
    }
                                           // 接著再把要被釋放記憶體的node之"parent"指向新的child
    if (y->parent == NULL){                // 若刪除的是原先的root, 就把x當成新的root
        this->root = x;
    }
    else if (y == y->parent->leftchild){    // 若y原本是其parent之left child
        y->parent->leftchild = x;           // 便把x皆在y的parent的left child, 取代y
    }
    else{                                   // 若y原本是其parent之right child
        y->parent->rightchild = x;          // 便把x皆在y的parent的right child, 取代y
    }
                                            // 針對case3
    if (y != delete_node) {                 // 若y是delete_node的替身, 最後要再將y的資料
        delete_node->key = y->key;          // 放回delete_node的記憶體位置, 並將y的記憶體位置釋放
        delete_node->element = y->element;  // 圖二(d), y即是達爾, delete_node即是西魯
    }

    delete y;                               // 將y的記憶體位置釋放
    y = 0;
}
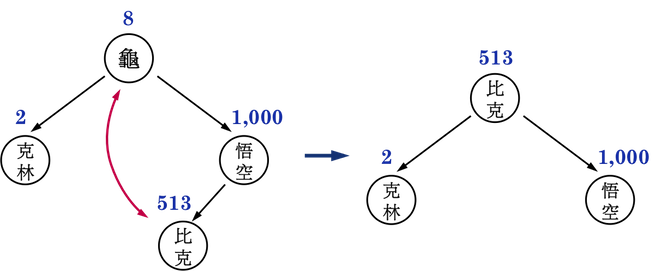
延續上一篇文章的main(),加入BST::DeleteBST,把龜仙人(8)刪除,應該會得到如圖三的BST,比克(513)成為新的root:
圖三:。
// C++ code
int main() {

    BST T;

    T.InsertBST(8,"龜仙人");
    T.InsertBST(1000,"悟空");
    T.InsertBST(2,"克林");
    T.InsertBST(513,"比克");


    cout << "Inorder Traversal:\n";
    T.InorderPrint();
    cout << endl << endl;
    cout << "Level-order Traversal:\n";
    T.Levelorder();
    cout << endl << endl;

    T.DeleteBST(8);         // 刪除龜仙人(8), 確認比克(513)會成為新的root

    cout << "Level-order Traversal:\n";
    T.Levelorder();
    cout << endl << endl;

    TreeNode *node = T.Search(1000);
    if(node != NULL){
        cout << "There is " << node->GetElement() << "(" << node->GetKey() << ")" << endl;
    }
    else {
        cout << "no element with Key(1000)" << endl;
    }

    node = T.Search(8);
    if(node != NULL){
        cout << "There is " << node->GetElement() << "(" << node->GetKey() << ")" << endl;
    }
    else {
        cout << "no element with Key(8)" << endl;
    }

    return 0;
}
output:
Inorder Traversal:
克林(2) 龜仙人(8) 比克(513) 悟空(1000)

Level-order Traversal:
龜仙人(8) 克林(2) 悟空(1000) 比克(513)

Level-order Traversal:
比克(513) 克林(2) 悟空(1000)

There is 悟空(1000)
no element with Key(8)
以上便是BST中BST::DeleteBST()之介紹,關鍵即在Successor與Predecessor。
在接下來將介紹的Red Black Tree(RBT,紅黑樹)中,BST的Insert()與Delete()會再次出現,不過,需要再「多一道手續」以滿足RBT的性質。
最後,因為RBT的圖比較複雜,圈圈裏面放名字會太擠,有礙觀瞻,因此要忍痛讓「悟空」、「克林」退居幕後,直接在node裡面放上Key。 不過,相信透過這三篇BST的介紹,讀者對七龍珠也有一定程度的了解,後面的部分一定可以靠自學來搜集龍珠了。
參考資料:
BST系列文章
Binary Search Tree: Intro(簡介)
Binary Search Tree: Search(搜尋資料)、Insert(新增資料)
Binary Search Tree: Sort(排序)、Delete(刪除資料)
回到目錄: