先備知識與注意事項
(完整範例程式碼也可以看這裡:BST_Search_Insert.cpp)
在開始介紹search(搜尋資料)與insert(新增資料)之前,先定義好class TreeNode與class BST,順便對未來將介紹的其他member function(成員函式)留下美好的第一印象:
// C++ code
#include <iostream>
#include <string>
#include <queue>

using std::string;
using std::cout;
using std::endl;

class BST;
class TreeNode{
private:
    TreeNode *leftchild;
    TreeNode *rightchild;
    TreeNode *parent;
    int key;
    string element;
public:
    TreeNode():leftchild(0),rightchild(0),parent(0),key(0),element(""){};
    TreeNode(int a, string b):leftchild(0),rightchild(0),parent(0),key(a),element(b){};

    int GetKey(){return key;}              // 為了在main()要能夠檢視node是否正確
    string GetElement(){return element;}   // 才需要這兩個member function讀取private data

    // 其餘情況, 因為class BST是class TreeNode的friend class
    // 在class BST的member function中, 可以直接存取class TreeNode的private data

    friend class BST;   // 放在 private 或 public 都可以
};

class BST{
private:
    TreeNode *root;
    TreeNode* Leftmost(TreeNode *current);
    TreeNode* Successor(TreeNode *current);
public:
    BST():root(0){};

    TreeNode* Search(int key);
    void InsertBST(int key, string element);
    void InorderPrint();        // 可以用來確認BST是否建立成功
    void Levelorder();          // 可以確認BST是否建立成功
};
小小備註:範例程式碼只是其中一種可行的方法,實作方法並不唯一,筆者相信有更優秀的寫法(有效利用記憶體、避免memory leak等議題),建議讀者可以多多參考例如Stack Exchange:Code Review等等眾多優秀的網站,看網友的程式碼的寫法以及由該份程式碼所開啟的討論串,應該會對實際寫作技巧有些幫助。
目錄
BST::Search(搜尋)
BST的Search()操作,便是根據BST的特徵:Key(L)<Key(Current)<Key(R),判斷Current應該往left subtree走,還是往right subtree走。
現有一棵BST如圖一(a)所示:
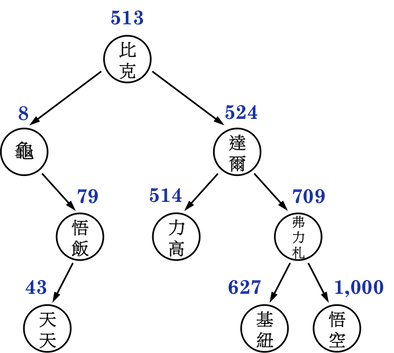
圖一(a):。
搜尋結果可能成功,可能失敗,以下便分別以兩個KEY值作說明。
搜尋成功
若現在要從BST中搜尋基紐隊長,便以基紐隊長的KEY(\(627\))進入BST。
進入BST後,便把用來移動的Current指向root,如圖一(b)。
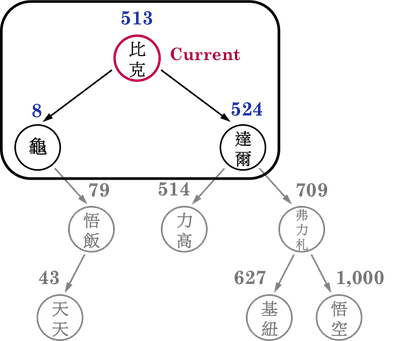
圖一(b):。
接著將KEY(\(627\))和比克(root)的戰鬥力(\(513\))比較,結果是基紐隊長戰勝,因此,基紐隊長如果在BST裡面,應該會長在比克的right subtree裡面,於是便將Current往比克的right child(達爾)移動,如圖一(c)。
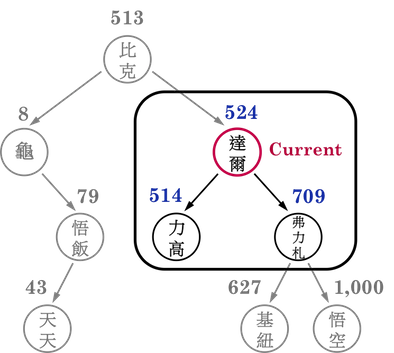
圖一(c):。
將Current移動到達爾之後,再將KEY(\(627\))與達爾的戰鬥力(\(524\))比較,結果仍然是基紐隊長大勝,因此步驟同上,繼續將Current往達爾的right child(弗力札)移動,如圖一(d)。
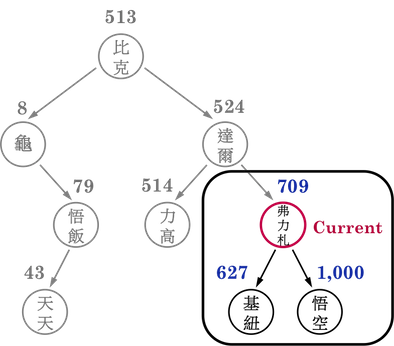
圖一(d):。
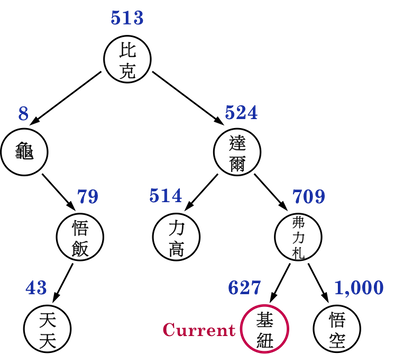
將Current移動到弗力札之後,再將KEY(\(627\))與弗力札的戰鬥力(\(709\))比較,結果是弗力札略勝,於是便往弗力札的left child尋找基紐隊長,如圖一(e)。
圖一(e):。
此時,Current的Key(\(627\))與傳送進Search()的KEY(\(627\))相同,便確認Current即為基紐隊長,於是跳出while迴圈,並傳回Current。
宣告搜尋成功。
搜尋失敗
若現在要從BST中尋找克林,便以克林的戰鬥力(\(2\))作為KEY(\(2\)),進入Search()。
進入BST後,同樣把用來移動的Current指向root,如圖一(b)。

圖一(b):。
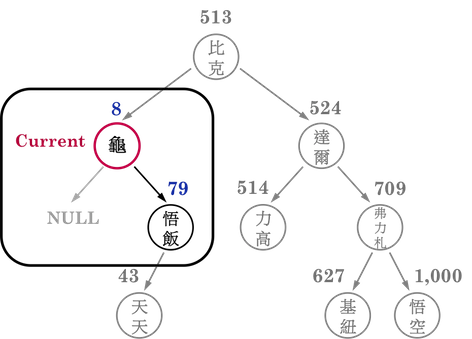
接著便將KEY(\(2\))和比克的戰鬥力(\(513\))比較,結果是比克勝出,如果克林(\(2\))在這棵BST中,應該會長在比克的left subtree上,於是將Currnet往比克的left child(龜仙人)移動,如圖一(f)。
圖一(f):。
將Current移動至龜仙人後,將KEY(\(2\))和龜仙人的戰鬥力(\(8\))比較,便判斷出,要將Current往龜仙人的left child移動,如圖一(f)。
然而,由於龜仙人沒有left child,於是Current指向NULL,便跳出迴圈,並回傳NULL,即表示搜尋失敗,克林不在BST中。
以下是BST::Search()的範例程式碼,其中,有兩種情況會跳出while迴圈:
Current移動到NULL,表示搜尋失敗。- KEY與
Current的key相同,表示搜尋成功;
這兩種情況作為條件式(condition)的先後順序很重要,因為如果Current是NULL,便不能對其key做存取,會產生諸如BAD_ACCESS的錯誤(error)。
// C++ code
TreeNode* BST::Search(int KEY){

    TreeNode *current = root;               // 將curent指向root作為traversal起點

    while (current != NULL && KEY != current->key) {  // 兩種情況跳出迴圈:
                                                      // 1.沒找到 2.有找到
        if (KEY < current->key){
            current = current->leftchild;   // 向左走
        }
        else {
            current = current->rightchild;  // 向右走
        }
    }
    return current;
}
BST::InsertBST(新增資料)
函式InsertBST()的概念,可以視為Search()的延伸:
- 根據BST對Key之規則,先找到將要新增之node「適合的位置」;
- 再將欲新增的node接上BST。
要尋找「對新增node而言的適當位置」,需要召喚一位「哨兵」先行探路,而「將會成為新增node的parent node(準新手爸媽)」的那個node,則跟著「哨兵」的腳步,往前推進。
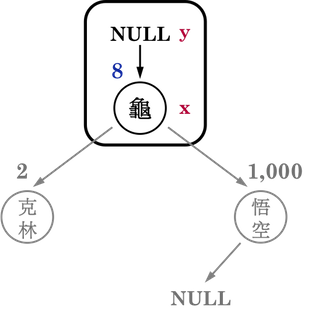
定義「哨兵」為x,「準新手爸媽」為y,現欲新增「比克(513)」進入圖二(a)的BST。
(這裡的「哨兵x」具有BST::Search()中Current的功能。)
圖二(a):。
如圖二(a),剛進入BST時,「哨兵x」進到root,而「準新手爸媽y」設為root的parent,即為NULL。
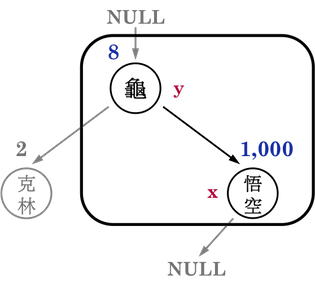
接著,將欲新增node之Key(比克(\(513\)))與「哨兵x」之Key(龜仙人(\(8\)))相比,比克的戰鬥力比龜仙人高,所以比克應該要長在龜仙人的right subtree,因此把「哨兵x」往龜仙人的right child(悟空)移動,並且更新「準新手爸媽y」為龜仙人,如圖二(b)。
- 若這棵BST裡沒有悟空(\(1000\))長在龜仙人的right child位置,那麼比克(\(513\))就會變成龜仙人的right child,所以稱龜仙人是「準新手爸媽」。
圖二(b):。
接著,繼續比較欲新增node之Key(比克(\(513\)))與「哨兵x」之Key(悟空(\(1000\))),結果是悟空的戰鬥力較高,比克應該要長在悟空的left subtree,因此,將「哨兵x」往悟空的left child(NULL)移動,同時更新「準新手爸媽y」為悟空,如圖二(c)。
更新後,「準新手爸媽y」成為悟空,「哨兵x」指向NULL壯烈犧牲,即達到跳出迴圈之條件。此時,便找到了「新增node」之適當位置。
那個「適當位置」在哪裡呢?就是「準新手爸媽y」的child pointer。
表示比克(\(513\))一定會是悟空(\(1000\))的child。
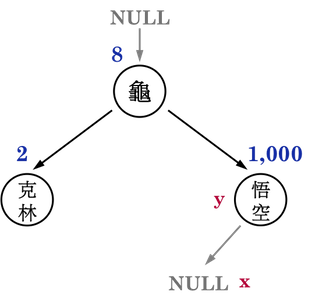
圖二(c):。
下一步,便是比較欲新增node之Key(比克(513))與「準新手爸媽y」之Key(悟空(1000))來判斷要接在left child還是right child的位置。
比較發現悟空戰鬥力較高,因此,比克(513)便成為「準新手爸媽y」的left child,如圖二(d),便成功把比克(513)接到BST上。
如此便完成了於BST中新增資料。
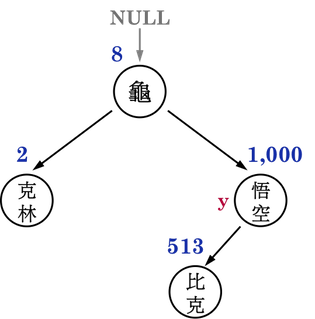
圖二(d):。
以下是InsertBST()的範例程式碼,關鍵便是「哨兵x」與「準新手爸媽y」的冒險之旅:
// C++ code
void BST::InsertBST(int key, string element){

    TreeNode *y = 0;        // 準新手爸媽
    TreeNode *x = 0;        // 哨兵
    TreeNode *insert_node = new TreeNode(key, element);   // insert_node為將要新增的node

    x = root;
    while (x != NULL) {                 // 在while中, 以如同Search()的方式尋找適當的位置
        y = x;                          // y先更新到原來x的位置
        if (insert_node->key < x->key){ // 判斷x是要往left- 還是right- 前進
            x = x->leftchild;
        }
        else{
            x = x->rightchild;
        }
    }                                   // 跳出迴圈後, x即為NULL
                                        // y即為insert_node的parent
    insert_node->parent = y;            // 將insert_node的parent pointer指向y

    if (y == NULL){                     // 下面一組if-else, 把insert_node接上BST
        this->root = insert_node;
    }
    else if (insert_node->key < y->key){
        y->leftchild = insert_node;
    }
    else{
        y->rightchild = insert_node;
    }
}
有了BST::InsertBST()後,就可以用土法煉鋼的方式建立一棵如圖二(d)的BST,再以Binary Tree: Traversal(尋訪)介紹過的Inorder Traversal與Level-Order Traversal檢驗,順便測試BST中是否有Key(\(1000\))與Key(\(73\))這兩筆資料:
// C++ code
int main() {

    BST T;

    T.InsertBST(8,"龜仙人");
    T.InsertBST(1000,"悟空");
    T.InsertBST(2,"克林");
    T.InsertBST(513,"比克");


    cout << "Inorder Traversal:\n";
    T.InorderPrint();
    cout << endl;
    cout << "Level-order Traversal:\n";
    T.Levelorder();
    cout << endl << endl;

    TreeNode *node = T.Search(1000);
    if(node != NULL){
        cout << "There is " << node->GetElement() << "(" << node->GetKey() << ")" << endl;
    }
    else {
        cout << "no element with Key(1000)" << endl;
    }

    node = T.Search(73);
    if(node != NULL){
        cout << "There is " << node->GetElement() << "(" << node->GetKey() << ")" << endl;
    }
    else {
        cout << "no element with Key(73)" << endl;
    }

    return 0;
}
output:
Inorder Traversal:
克林(2) 龜仙人(8) 比克(513) 悟空(1000)
Level-order Traversal:
龜仙人(8) 克林(2) 悟空(1000) 比克(513)

There is 悟空(1000)
no element with Key(73)
結果看起來與圖二(d)一致:
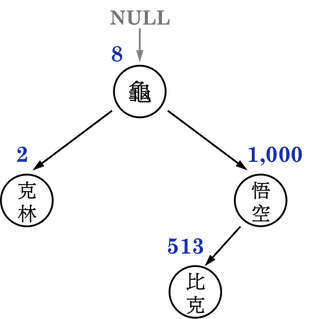
圖二(d):。
以上便是BST中Search()與InsertBST()之介紹。
只要掌握BST的性質Key(L)<Key(Current)<Key(R)與樹中的Traversal(pointer的移動)即可輕鬆上路。
參考資料:
- Introduction to Algorithms, Ch12
- Fundamentals of Data Structures in C++, Ch5
- Binary Tree: Traversal(尋訪)
BST系列文章
Binary Search Tree: Intro(簡介)
Binary Search Tree: Search(搜尋資料)、Insert(新增資料)
Binary Search Tree: Sort(排序)、Delete(刪除資料)
回到目錄: