先備知識與注意事項
本篇文章將延續Linked List: Intro(簡介),繼續介紹於Linked list中常見的操作:新增資料、刪除資料與反轉Linked list。

Linked list
(完整範例程式碼也可以看這裡:Linkedlist.cpp)
class ListNode與class LinkedList的定義如下:
// C++ code
#include <iostream>
using std::cout;
using std::endl;

class LinkedList;    // 為了將class LinkedList設成class ListNode的friend,
                     // 需要先宣告
class ListNode{
private:
    int data;
    ListNode *next;
public:
    ListNode():data(0),next(0){};
    ListNode(int a):data(a),next(0){};

    friend class LinkedList;
};

class LinkedList{
private:
    // int size;                // size是用來記錄Linked list的長度, 非必要
    ListNode *first;            // list的第一個node
public:
    LinkedList():first(0){};
    void PrintList();           // 印出list的所有資料
    void Push_front(int x);     // 在list的開頭新增node
    void Push_back(int x);      // 在list的尾巴新增node
    void Delete(int x);         // 刪除list中的 int x
    void Clear();               // 把整串list刪除
    void Reverse();             // 將list反轉: 7->3->14 => 14->3->7
};
目錄
函式:PrintList
第一個要介紹的是PrintList(),功能就是把Linked list中的所有資料依序印出。要印出所有的資料,就必須「逐一訪問(Visiting)」Linked list中的每一個node,這樣的操作又稱為Traversal(尋訪)。
能夠完成這樣的操作,要歸功於node中記錄了「下一個node的記憶體位置」,如此,才能在訪問完當前的node之後,知道要繼續往哪一個記憶體位置上的node前進。
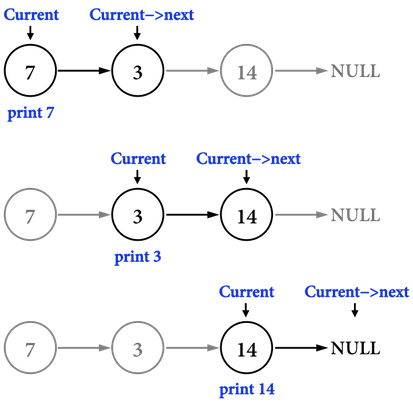
圖一。
以圖一為例:
- 建立
ListNode *current來表示「目前走到哪一個node」。 - 若要對Linked list存取資料,必定是從第一個node開始,所以把
current指向first所代表的記憶體位置,current=first。- 目前
first即為node(\(7\))。 - 同時,還能夠知道「下一個node」是指向node(\(3\))。
- 目前
- 在印出
current->data,也就是\(7\)後,便把current移動到「下一個node」。- 透過
current=current->next,即可把current指向node(\(3\))所在的記憶體位置。
- 透過
- 重複上述步驟,直到
current指向Linked list的終點NULL為止,便能印出所有資料。
由此可見,所有需要在Linked list中尋找特定資料的操作,都會用上Traversal。
程式範例如下:
// C++ code
void LinkedList::PrintList(){

    if (first == 0) {                      // 如果first node指向NULL, 表示list沒有資料
        cout << "List is empty.\n";
        return;
    }

    ListNode *current = first;             // 用pointer *current在list中移動
    while (current != 0) {                 // Traversal
        cout << current->data << " ";
        current = current->next;
    }
    cout << endl;
}
函式:Push_front
Push_front()的功能是在Linked list的開頭新增資料。
若考慮在Linked list(\(3\)->\(14\))的開頭加入\(23\),方法如下:
- 先建立一個新的節點
ListNode *newNode,帶有欲新增的資料(\(23\)),如圖二(a)。 - 將
newNode中的pointer:ListNode *next,指向Linked list的第一個nodefirst,如圖二(b)。 - 接著,把
first更新成newNode。
經過以上步驟(時間複雜度為O(\(1\)))便得到新的Linked list:\(23\)->\(3\)->\(14\)。
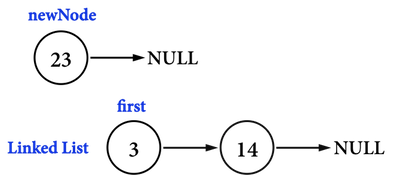
圖二(a)。

圖二(b)。
程式範例如下:
// C++ code
void LinkedList::Push_front(int x){

    ListNode *newNode = new ListNode(x);   // 配置新的記憶體
    newNode->next = first;                 // 先把first接在newNode後面
    first = newNode;                       // 再把first指向newNode所指向的記憶體位置
}
函式:Push_back
Push_back()的功能是在Linked list的尾巴新增資料。
若考慮在Linked list(\(7\)->\(3\)->\(14\))的尾巴加入\(23\),方法如下:
- 先建立一個新的節點
ListNode *newNode,帶有欲新增的資料(\(23\))。 - 先利用如同
PrintList()中提過的Traversal,把新建立的ListNode *current移動到Linked list的尾端,node(\(14\)),如圖三(a)。- 有些資料結構會在
class LinkedList中新增一項ListNode *last,記錄Linked list的最後一個node,那麼,Push_back()就不需要Traversal,可以在O(\(1\))時間內完成。 - 若沒有
ListNode *last,就需要O(\(N\))的Traversal。
- 有些資料結構會在
- 接著把
current的next pointer指向newNode,如圖三(b)。
即可得到新的Linked list:\(7\)->\(3\)->\(14\)->\(23\)。
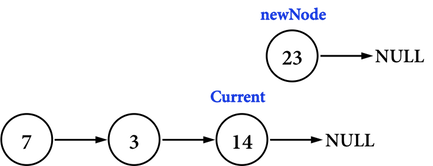
圖三(a)。
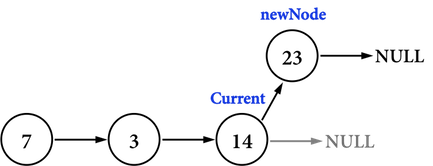
圖三(b)。
程式範例如下:
// C++ code
void LinkedList::Push_back(int x){

    ListNode *newNode = new ListNode(x);   // 配置新的記憶體

    if (first == 0) {                      // 若list沒有node, 令newNode為first
        first = newNode;
        return;
    }

    ListNode *current = first;
    while (current->next != 0) {           // Traversal
        current = current->next;
    }
    current->next = newNode;               // 將newNode接在list的尾巴
}
函式:Delete
Delete(int x)的功能是要刪除Linked list中,資料為int x的node。
一共會有兩種情形,第一種是Linked list中確實有int x,第二種是沒有。
在第一種情況中,需要再特別考慮「int x位於first」的情況。
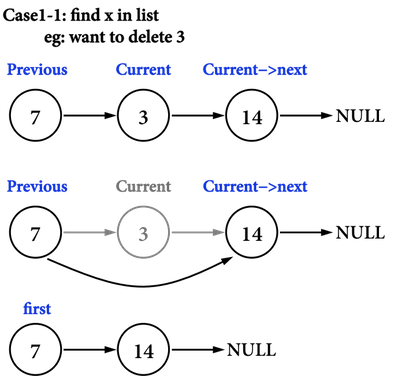
case1-1:要在Linked list(\(7\)->\(3\)->\(14\))中刪除具有\(3\)的node,見圖四(a):
- 建立兩個在Linked list中移動的指標:
*current以及*previous。 - 利用Traversal的概念,以
ListNode *current指向node(\(3\)),以ListNode *previous指向node(\(3\))的「前一個node」,node(\(7\))。 - 接著,把
previous的pointer指向current的pointer。- 此處,即為以node(\(7\))記住node(\(14\))的記憶體位置。
- 再把
current的記憶體釋放(若是使用new進行動態配置,就使用delete釋放),還給heap。
關鍵就是,在整個Delete()的過程,只有node(\(3\))知道node(\(14\))的記憶體位置,所以在把node(\(3\))刪除之前,必須先透過node(\(3\))的pointer找到node(\(14\)),把node(\(14\))接到node(\(7\))上之後,才可以釋放node(\(3\))的記憶體位置。
圖四(a)。
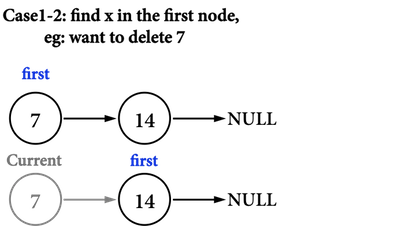
case1-2:若要刪除具有\(7\)的node,而且node(\(7\))位於Linked list的第一個位置(也就是*first),見圖四(b):
- 需要把這個情況獨立出來的原因是,這個情況不會進行Traversal,所以
ListNode *previous始終指向NULL,便不能呼叫其private data,若進行previous->next將會因為意圖對「無效的」記憶體位置進行存取,而產生像是「EXC_BAD_ACCESS」的錯誤(error)。
移除的方法:
- 只要將
first向後移動至first->next。 - 再釋放
current的記憶體位置即可。- 若Linked list只有一個node,那麼
first=first->next將會把first指向NULL。
- 若Linked list只有一個node,那麼
圖四(b)。
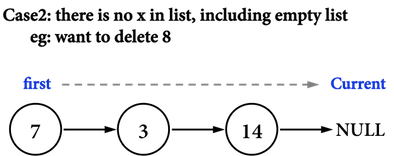
case2:若Linked list中沒有要刪除的node,見圖四(c):
- 若想要刪除\(8\),但是Linked list(\(7\)->\(3\)->\(14\))沒有\(8\),那麼在Traversal後,
ListNode *current會一路走到Linked list的結尾,也就是NULL。 - 若Linked list本來就是空的,那麼建立的
ListNode *current = first,current也會指向NULL。 - 以上這兩種情況,直接結束
Delete()函式。
圖四(c)。
程式範例如下:
// C++ code
void LinkedList::Delete(int x){

    ListNode *current = first,
             *previous = 0;
    while (current != 0 && current->data != x) {  // Traversal
        previous = current;                       // 如果current指向NULL
        current = current->next;                  // 或是current->data == x
    }                                             // 即結束while loop

    if (current == 0) {                 // list沒有要刪的node, 或是list為empty
        std::cout << "There is no " << x << " in list.\n";
        // return;
    }
    else if (current == first) {        // 要刪除的node剛好在list的開頭
        first = current->next;          // 把first移到下一個node
        delete current;                 // 如果list只有一個node, 那麼first就會指向NULL
        current = 0;                    // 當指標被delete後, 將其指向NULL, 可以避免不必要bug
        // return;
    }
    else {                              // 其餘情況, list中有欲刪除的node,
        previous->next = current->next; // 而且node不為first, 此時previous不為NULL
        delete current;
        current = 0;
        // return;
    }
}
函式:Clear
Clear()的功能是清除整個Linked list。方法如下:
- 從Linked list的「第一個node」
first開始,進行Traversal。- 利用
first=first->next即可不斷移動first。
- 利用
- 建立一個
ListNode *current記錄「要刪除的node」之記憶體位置。 - 重複上述步驟,直到
first指向Linked list的尾巴NULL為止。
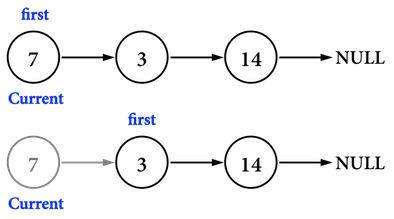
見圖五(a):
- 原先
first記錄的是node(\(7\))。 - 建立
ListNode *current記錄first,也就是node(\(7\))。 - 將
first移動到node(\(3\))。 - 刪除
current指向的node(\(7\))。
如此,便把node(\(7\))從Linked list移除。
圖五(a)。
見圖五(b):
- 目前
first記錄的是node(\(3\))。 - 建立
ListNode *current記錄first,也就是node(\(3\))。 - 將
first移動到node(\(14\))。 - 刪除
current指向的node(\(3\))。
如此,便把node(\(3\))從Linked list移除。

圖五(b)。
見圖五(c):
- 目前
first記錄的是node(\(14\))。 - 建立
ListNode *current記錄first,也就是node(\(14\))。 - 將
first移動到NULL。 - 刪除
current指向的node(\(14\))。
這樣便把Linked list的node刪除完畢。
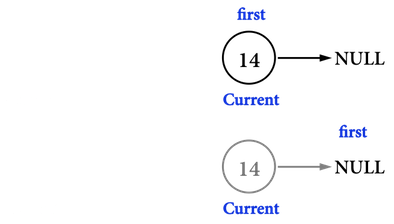
圖五(c)。
程式範例如下:
// C++ code
void LinkedList::Clear(){

    while (first != 0) {            // Traversal
        ListNode *current = first;
        first = first->next;
        delete current;
        current = 0;
    }
}
函式:Reverse
Reverse()的功能是反轉Linked list,以圖六(a)的Linked list為例,經過Reverse()之後,預期得到圖六(b)。

圖六(a)。

圖六(b)。
要倒轉Linked list,其實就是把每個node的pointer的方向前後對調,但是因為每個node都只有被Linked list中的「一個node」記得,例如圖六(a),只有node(\(7\))記得node(\(3\))的記憶體位置,只有node(\(14\))記得node(\(8\))的記憶體位置,所以,如果把node(\(14\))的ListNode *next(原本指向node(\(8\)))更新成指向node(\(3\)),那麼整個Linked list中,就再也無法存取node(\(8\))。
所以在更新任何一個node之pointer之前,除了要知道「新的要指向的node」之記憶體位置,也要記錄「原先記錄的node」之記憶體位置,這裡使用三個指向node的指標,分別為previous、current、preceding,以圖六(c)為例:
- 目前
current為node(\(3\)),其指標current->next指向的是node(\(14\))。 - 目前
previous為node(\(7\)),是current->next最後要指向的記憶體位置。 - 目前
preceding為node(\(14\)),避免current->next更新成node(\(7\))後,再也找不到node(\(14\))。
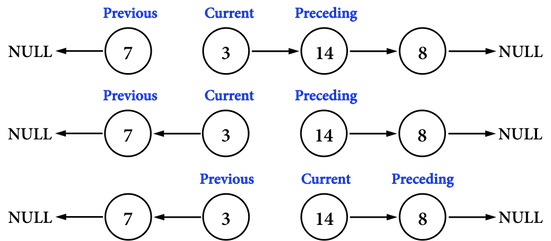
圖六(c)。
有了這三個指標後,要執行的步驟只有兩個:
- 將
current->next從原本指向preceding更新成指向previous,如圖六(c)中圖。- 執行
current->next=previous,就把node(\(3\))的指向node(\(7\))。
- 執行
- 把三個指標「按照順序」往前移動,然後進行下一個node之pointer調整,如圖六(c)下圖。
previous=current,將previous移動到node(\(3\))。current=preceding,將current移動到node(\(14\))。preceding=preceding->next,將preceding移動到node(\(8\))。
重複上述步驟,直到preceding更新成NULL,調整Linked list的first所指向的記憶體位置,即完成Linked list之反轉。
完整圖示見圖六(d):
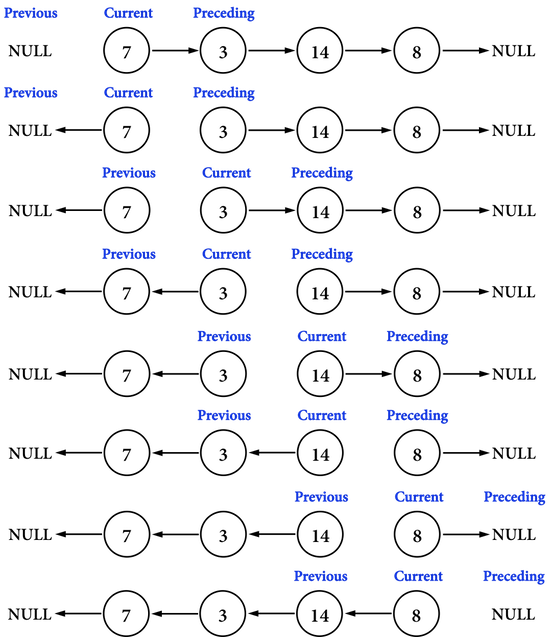
圖六(d)。
程式範例如下:
// C++ code
void LinkedList::Reverse(){

    if (first == 0 || first->next == 0) {
        // list is empty or list has only one node
        return;
    }

    ListNode *previous = 0,
             *current = first,
             *preceding = first->next;

    while (preceding != 0) {
        current->next = previous;      // 把current->next轉向
        previous = current;            // previous往後挪
        current = preceding;           // current往後挪
        preceding = preceding->next;   // preceding往後挪
    }                                  // preceding更新成NULL即跳出while loop

    current->next = previous;          // 此時current位於最後一個node, 將current->next轉向
    first = current;                   // 更新first為current
}
測試
在main()測試前面所介紹的各個函式。
//C++ code
int main() {

    LinkedList list;     // 建立LinkedList的object
    list.PrintList();    // 目前list是空的
    list.Delete(4);      // list是空的, 沒有4
    list.Push_back(5);   // list: 5
    list.Push_back(3);   // list: 5 3
    list.Push_front(9);  // list: 9 5 3
    list.PrintList();    // 印出:  9 5 3
    list.Push_back(4);   // list: 9 5 3 4
    list.Delete(9);      // list: 5 3 4
    list.PrintList();    // 印出:  5 3 4
    list.Push_front(8);  // list: 8 5 3 4
    list.PrintList();    // 印出:  8 5 3 4
    list.Reverse();      // list: 4 3 5 8
    list.PrintList();    // 印出:  4 3 5 8
    list.Clear();        // 清空list
    list.PrintList();    // 印出: List is empty.

    return 0;
}
output:
List is empty.
There is no 4 in list.
9 5 3
5 3 4
8 5 3 4
4 3 5 8
List is empty.
以上是在Linked List中新增資料、刪除資料與反轉Linked list的方法介紹。
程式的實作方式根據class LinkedList的建立方式會有所不同,不過使用pointer的邏輯應該是大同小異的。
參考資料:
- Introduction to Algorithms, Ch10
- Fundamentals of Data Structures in C++, Ch4
- 小殘的程式光廊:連結串列(Linked List)
Linked List系列文章
Linked List: Intro(簡介)
Linked List: 新增資料、刪除資料、反轉
回到目錄: